Hey there, coding champ! 👋
So you’ve built a cool Node.js app on your computer…
Now you’re wondering: “How do I show this to the world?” 🌍
Well, that’s what deployment is all about.
We’re going to learn how to deploy your Node.js app, step by step — just like putting your project on stage for everyone to see 🎤.
🌐 What is Deployment?
Deployment means moving your code from your local machine to a public server so others can access it using a browser.
It’s like turning your personal app into a live website.
🧳 Different Deployment Options for Node.js Apps
There are many ways to deploy a Node.js app, like choosing the best travel option ✈️🚂🚗.
🔥 Popular Cloud Platforms:
| Platform | Features |
|---|---|
| Heroku | Easiest to use, great for beginners 🎯 |
| Render | Free tier, easy GitHub integration |
| Vercel | Best for front-end, but can host Node.js functions too ⚡ |
| Railway | Dev-friendly, free tier, and serverless-ready 🚂 |
| AWS EC2 | More control, but advanced users only 🧠 |
| DigitalOcean | Good performance, affordable droplets 💧 |
💡 Tip: If you’re just starting, use Heroku or Render. They’re simple and beginner-friendly.
🧪 Step-by-Step: Deploy on Heroku (Easy Method)
Let’s deploy a sample Node.js app on Heroku.
1️⃣ Create a Simple App (If You Don’t Have One)
bashCopyEditmkdir myapp
cd myapp
npm init -y
npm install express
app.js
jsCopyEditconst express = require('express');
const app = express();
const PORT = process.env.PORT || 3000;

app.get('/', (req, res) => {
  res.send('Hello from Web Codder 👋');
});

app.listen(PORT, () => {
  console.log(`Server running on port ${PORT}`);
});
2️⃣ Add a Procfile
This tells Heroku how to run your app.
Create a file named Procfile with no extension:
makefileCopyEditweb: node app.js
3️⃣ Push Code to Git
bashCopyEditgit init
git add .
git commit -m "My first deploy"
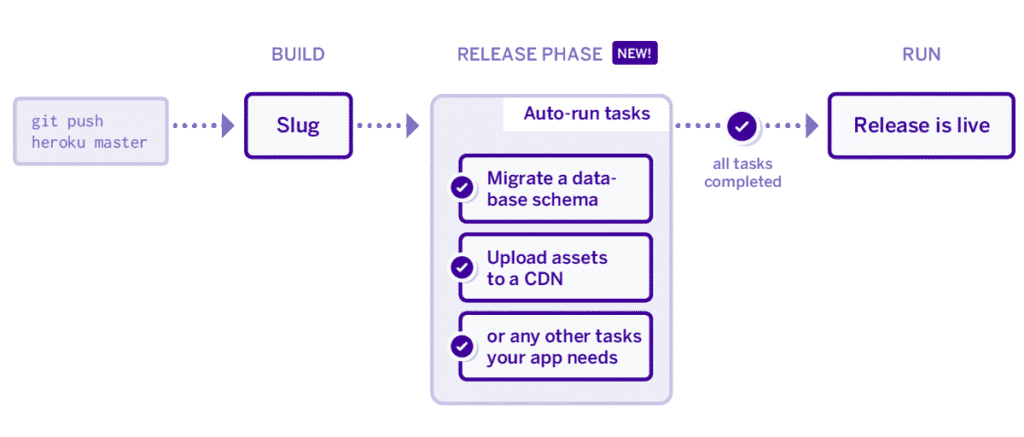
4️⃣ Deploy to Heroku
bashCopyEditheroku login
heroku create my-webcodder-app
git push heroku master
🎉 Boom! Your app is live at https://my-webcodder-app.herokuapp.com
🚀 3.10. Deploying Your Node.js Application – The Beginner's Guide 2
🌍 Setting Environment Variables
Environment variables help you switch settings between development and production.
Example:
jsCopyEditconst dbPassword = process.env.DB_PASSWORD;
For Local Dev:
Create a .env file:
envCopyEditDB_PASSWORD=my-secret-password
Install dotenv:
bashCopyEditnpm install dotenv
In your code:
jsCopyEditrequire('dotenv').config();
💡 This keeps your secrets safe and lets you use different values for local vs production!
🔄 Configuring Reverse Proxy with NGINX (For VPS like DigitalOcean)
When using a VPS (Virtual Private Server), you often need a reverse proxy to handle traffic.
What’s a Reverse Proxy?
Think of it like a receptionist 🧑💼. It forwards traffic to your app, handles ports, and adds HTTPS.
Here’s how to use NGINX with a Node app running on port 3000:
Example NGINX Config:
nginxCopyEditserver {
  listen 80;
  server_name yourdomain.com;

  location / {
    proxy_pass http://localhost:3000;
    proxy_http_version 1.1;
    proxy_set_header Upgrade $http_upgrade;
    proxy_set_header Connection 'upgrade';
    proxy_set_header Host $host;
    proxy_cache_bypass $http_upgrade;
  }
}
🔐 You can also use Let’s Encrypt to add FREE HTTPS with Certbot!
📊 Infographic: Deployment at a Glance
[Insert Deployment Workflow Infographic Placeholder]
- Build your app 🧱
- Choose a platform ☁️
- Push your code 🚀
- Set environment variables 🔑
- Configure domain + HTTPS 🌐
🎯 Quick Comparison Table
| Task | Heroku | DigitalOcean VPS |
|---|---|---|
| Easy to Set Up | ✅ | ❌ (needs setup) |
| Custom Domains | ✅ | ✅ |
| HTTPS (SSL) | ✅ Auto | ✅ (manual) |
| Environment Variables | ✅ | ✅ |
| Cost | Free/paid tiers | Paid (droplets) |
🏁 Conclusion
Deploying your app is like publishing your book 📚 to the world.
And now, you know how to do it with Node.js — the fun and easy way!
📣 Let’s Stay Connected!
If this guide helped you, we’d love your support 🫶
Let’s keep building cool things together 💻💡
See you in the next tutorial! 🚀