Hey Web Codders! 👋 I’m Vikas Sankhla, your tech buddy from Web Codder, and today we’re diving into something SUPER COOL: Amazon EC2. 😄
You might be wondering:
👉 What is EC2?
👉 How can I use it to host my app?
👉 Is it hard to set up?
Don’t worry! I’m going to explain everything step-by-step, super simple.
🌟 What Is Amazon EC2?
Let’s imagine this: You want to run your app on a powerful computer that’s always online.
Instead of buying your own computer, Amazon rents you one on the internet! 💻☁️
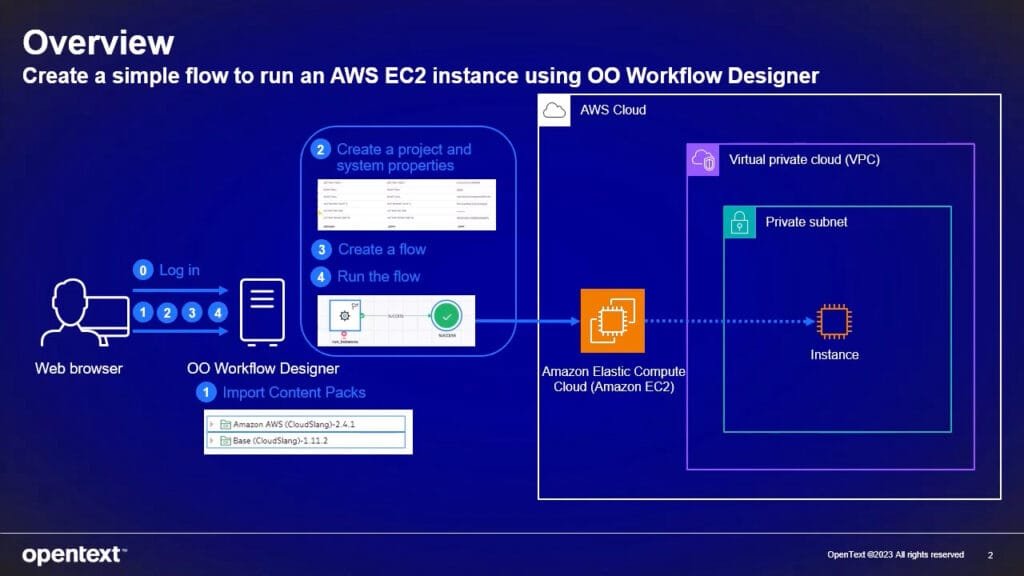
That’s what EC2 (Elastic Compute Cloud) is—a virtual server you can use anytime, anywhere. 🚀
💡 In simple words:
EC2 = A computer in the cloud that runs your app. ✅
🖥️ Why Do We Need EC2?
- Your app needs a home 🏠 (a server).
- You want your app to be available 24/7. 🕒
- You don’t want to worry about hardware & electricity. 🔌
EC2 solves all that by giving you:
✅ A computer that’s always on.
✅ The ability to choose your power.
✅ Global access (users from anywhere can visit).
🛠️ How to Set Up an EC2 Instance (Step-by-Step)
Let’s host your app on EC2. Follow these easy steps:
1️⃣ Sign In to AWS Console
👉 Go to aws.amazon.com
👉 Log in or create an account.
Note: AWS gives you free tier access for 12 months! 🎉
2️⃣ Launch a New EC2 Instance 🚀
- Click “EC2” in the services menu.
- Click “Launch Instance.”
✅ Choose an Amazon Machine Image (AMI):
Pick Ubuntu Server 20.04 LTS (free tier eligible).
✅ Choose Instance Type:
Pick t2.micro (also free tier!).
3️⃣ Configure Instance Details 🛠️
- Number of instances: 1
- Network: Default VPC
- Subnet: Pick one (closest to your region)
💡 You can leave most settings as default.
4️⃣ Add Storage 💾
Default: 8GB is fine for small apps.
5️⃣ Add Tags 🏷️
Example:
Key: Name
Value: MyFirstEC2
(Helps you identify your instance later!)
6️⃣ Configure Security Group 🔐
👉 Allow SSH (port 22) so you can connect.
👉 Allow HTTP (port 80) if you’re hosting a website.
👉 Optional: Allow HTTPS (port 443) for secure sites.
(⚠️ Always be careful with security—don’t allow too much open access!)
7️⃣ Launch 🚀
- Click “Launch.”
- Choose “Create new key pair.”
- Download the .pem file (IMPORTANT: Keep this safe!).
🌍 Understanding EC2: Instance Types, Regions & Zones
| 🔑 Concept | 📝 What It Means |
|---|---|
| Instance Type | The “power level” of your server (CPU, RAM). Example: t2.micro. |
| Region | The country/area where your server is. Example: Asia Pacific (Mumbai). |
| Availability Zone | A data center in your region (for high availability). |
👉 Tip: Always choose a region near your users for best speed! ⚡
🔗 How to Connect to Your EC2 Instance (SSH)
You’ve launched your EC2—yay! 🎉 Now let’s log in to your cloud server.
1️⃣ Open Terminal (Mac/Linux) or PowerShell (Windows)
2️⃣ Use SSH Command
Example:
bashCopyEditssh -i /path/to/your-key.pem ubuntu@your-ec2-public-ip
👉 Replace:
/path/to/your-key.pem= Your downloaded key file path.your-ec2-public-ip= Find it in EC2 dashboard (Public IPv4).
💡 First time? It might ask:Are you sure you want to connect?
Type: yes ✅
🔐 Set Up Security Credentials
Remember: Never share your .pem file or your server IP publicly! 🚨
You can also:
- Create IAM roles/users for better access control.
- Set up firewall rules (in Security Groups).

1️⃣ Create EC2
2️⃣ Configure security 🔐
3️⃣ Launch 🚀
4️⃣ Connect via SSH 🔗
5️⃣ Host your app 🌍
🏁 Conclusion: Your First EC2 Server Is Live! 🚀
Awesome job, coder fam! 🎉 You just set up a real cloud server using EC2. 😎
Now you can:
- Host websites
- Run backend apps
- Experiment with servers like a pro developer. 💻
👉 In the next guide, we’ll deploy a React app to your EC2 & make it live for the world. 🌎
✅ Don’t miss out! Subscribe & follow:


